Installation
INSTALLATION
CAUTION / NOTICE / HINT
HINT:
- Use the same procedure for the RH side and LH side.
- The following procedure is for the LH side.
PROCEDURE
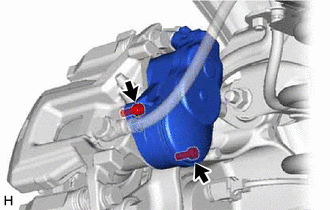
1. INSTALL PARKING BRAKE ACTUATOR ASSEMBLY
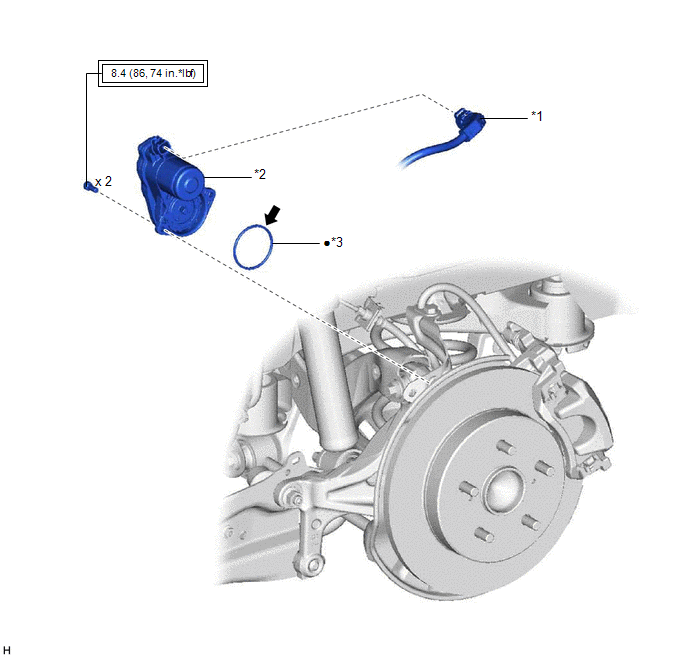
(a) Apply a light coat of lithium soap base glycol grease to a new O-ring.
(b) Install the O-ring to the rear disc brake cylinder assembly.
NOTICE:
Make sure to replace the O-ring with a new one when installing the parking brake actuator assembly.
(c)
Using a 5 mm hexagon socket wrench, install the parking brake actuator
assembly to the rear disc brake cylinder assembly with the 2 bolts.
Torque:
8.4 N·m {86 kgf·cm, 74 in·lbf}
2. CONNECT NO. 2 PARKING BRAKE WIRE ASSEMBLY
(a) Connect the No. 2 parking brake wire assembly connector to the parking brake actuator assembly.
3. INSTALL REAR WHEEL
Click here 
On-vehicle Inspection
ON-VEHICLE INSPECTION
PROCEDURE
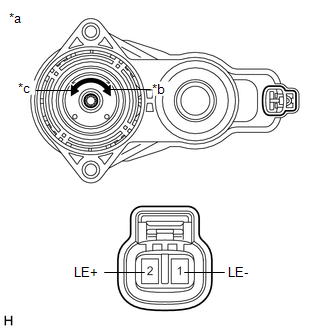
1. INSPECT PARKING BRAKE ACTUATOR ASSEMBLY (for Gasoline Model)
HINT:
Using
the Techstream to perform the Active Tests allows relays, VSVs and
actuators and other items to be operated without removing any parts.
This non-intrusive functional inspection can be very useful because
intermittent operation may be discovered before parts or wiring is
disturbed. Performing Active Tests early in troubleshooting is one way
to save diagnostic time. Data List information can be displayed while
performing Active Tests.
(a) Turn the engine switch off.
(b) Connect the Techstream to the DLC3.
(c) Turn the engine switch on (IG).
(d) Turn the Techstream on.
(e) Enter the following menus: Chassis / ABS/VSC/TRAC/EPB / Active Test.
(f)
When the vehicle's tires are lifted off the ground and the Techstream
is used to operate the electric parking brake, check the condition of
the rear tires.
(g) According to the display on the tester, perform the Active Test.
Chassis > ABS/VSC/TRAC/EPB > Active Test
|
Tester Display |
| PKB Lock Control |
Chassis > ABS/VSC/TRAC/EPB > Active Test
|
Tester Display |
| PKB Release Control |
OK: |
Tester Display | Control Range |
Condition of the Rear Tire |
|
PKB Lock Control | ON |
Lock |
| PKB Release Control |
ON | Free |
If the result is not as specified, inspect the electric parking brake actuator.
Click here 
(h)
Turn the engine switch on (IG), push the electric parking brake switch
to the lock side for 1 second and check that the parking brake indicator
light (red) illuminates.
(i) Push the electric
parking brake switch to the release side for 1 second and check that the
parking brake indicator light (red) turns off.
(j) Also, check that the brake warning light / yellow (minor malfunction) does not illuminate at this time.
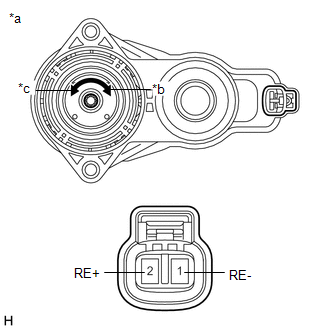
2. INSPECT PARKING BRAKE ACTUATOR ASSEMBLY (for HV Model)
HINT:
Using
the Techstream to perform the Active Tests allows relays, VSVs and
actuators and other items to be operated without removing any parts.
This non-intrusive functional inspection can be very useful because
intermittent operation may be discovered before parts or wiring is
disturbed. Performing Active Tests early in troubleshooting is one way
to save diagnostic time. Data List information can be displayed while
performing Active Tests.
(a) Turn the power switch off.
(b) Connect the Techstream to the DLC3.
(c) Turn the power switch on (IG).
(d) Turn the Techstream on.
(e) Enter the following menus: Chassis / Electric Parking Brake / Active Test.
(f)
When the vehicle's tires are lifted off the ground and the Techstream
is used to operate the electric parking brake, check the condition of
the rear tires.
(g) According to the display on the tester, perform the Active Test.
Chassis > Electric Parking Brake > Active Test
|
Tester Display |
| PKB Lock Control |
Chassis > Electric Parking Brake > Active Test
|
Tester Display |
| PKB Release Control |
OK: |
Tester Display | Control Range |
Condition of the Rear Tire |
|
PKB Lock Control | ON |
Lock |
| PKB Release Control |
ON | Free |
If the result is not as specified, inspect the electric parking brake actuator.
Click here 
(h)
Turn the power switch on (IG), push the electric parking brake switch
to the lock side for 1 second and check that the parking brake indicator
light (red) illuminates.
(i) Push the electric
parking brake switch to the release side for 1 second and check that the
parking brake indicator light (red) turns off.
(j) Also, check that the brake warning light / yellow (minor malfunction) does not illuminate at this time.
Removal
REMOVAL
CAUTION / NOTICE / HINT
HINT:
- Use the same procedure for the RH side and LH side.
- The following procedure is for the LH side.
PROCEDURE
1. PRECAUTION
Click here

2. RELEASE PARKING BRAKE
(a) Move the shift lever to P.
(b) Turn the engine switch (for Gasoline Model) or power switch (for HV Model) on (IG).
(c) Operate the electric parking brake switch assembly to release the parking brake.
HINT:
If the parking brake cannot be released:
for HV Model: Click here

for Gasoline Model: Click here

(d) Turn the engine switch (for Gasoline Model) or power switch (for HV Model) off.
3. REMOVE REAR WHEEL
Click here 
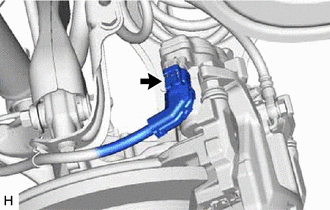
4. DISCONNECT NO. 2 PARKING BRAKE WIRE ASSEMBLY
| (a) Disconnect the No. 2 parking brake wire assembly connector from the parking brake actuator assembly.
NOTICE:
- Remove any dirt or foreign matter on and around the No. 2 parking brake wire assembly connector before performing this step.
- Do not allow water, oil or dirt to enter the No. 2 parking brake wire assembly connector.
| |
5. REMOVE PARKING BRAKE ACTUATOR ASSEMBLY
| (a)
Using a 5 mm hexagon socket wrench, remove the 2 bolts and parking
brake actuator assembly from the rear disc brake cylinder assembly.
NOTICE:
- Check for brake fluid leaks on the back side of the rear disc brake cylinder assembly.
- If there are any brake fluid leaks, replace the rear disc brake cylinder assembly.
| |
(b) Remove the O-ring from the rear disc brake cylinder assembly.
